Quick Facts
- Feature Availability: Free (No subscription required for activity zones)
- Hardware Advantage: 143-degree diagonal field of view
- Detection Technology: Pixel Difference Analysis (PDA)
- Effective Range: Optimized for motion detection between 7 to 19 feet
- Sensitivity Scale: Adjustable from 1 (lowest) to 9 (highest)
- Setup Time: Approximately 7 minutes for a full custom configuration
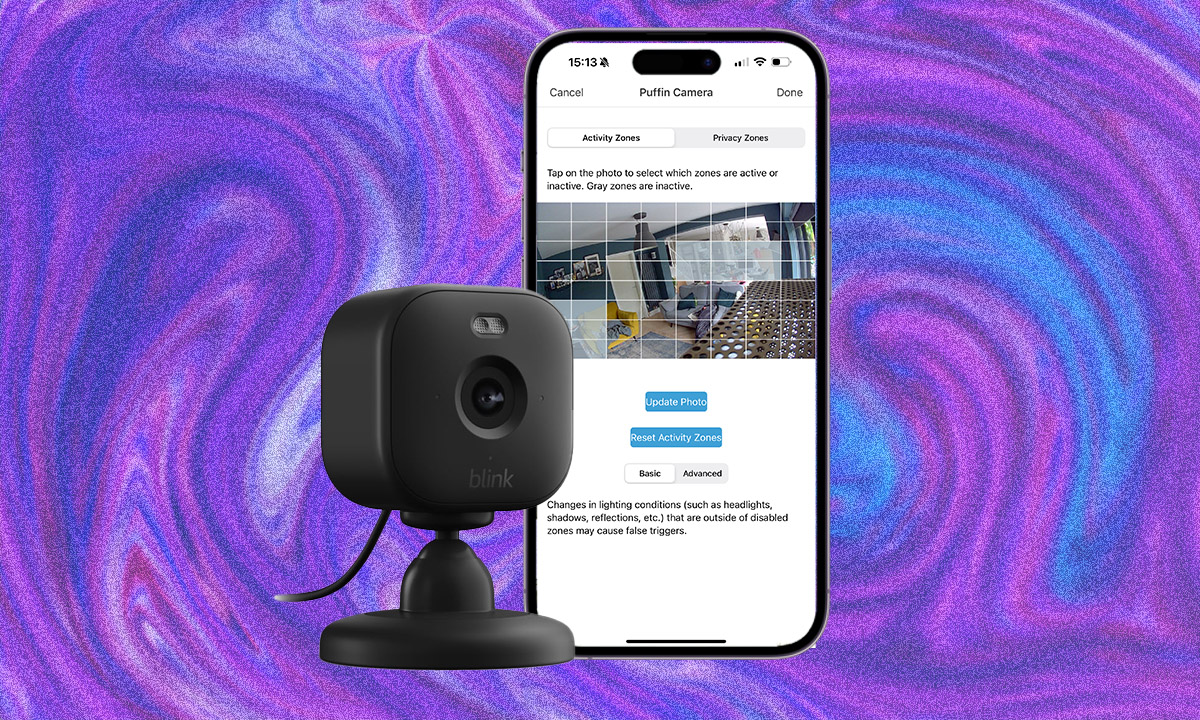
To set up Blink Activity Zones on the Blink Mini 2, open the Blink Home Monitor app and tap the Settings icon for your camera. Select Motion Settings, then tap Activity Zones. Use the grid selection tool to tap squares you want the camera to ignore, which turns them grey, and save your changes to finalize the setup. Blink Activity Zones are available on the Blink Mini 2 without requiring a paid subscription plan. This feature allows users to customize motion detection areas and minimize unwanted notifications by masking specific regions within the camera's field of view, such as areas with moving fans or pet activity.
Understanding the Blink Mini 2 Motion System
When you add a camera like the Blink Mini 2 to your smart home ecosystem, you are looking for a balance between security and convenience. The most common complaint with indoor cameras is alert fatigue—the constant pinging of your phone because a curtain moved or a light flickered. This is where understanding the Blink Mini 2 motion settings becomes essential.
The Blink Mini 2 utilizes a sophisticated detection method known as Pixel Difference Analysis (PDA). Unlike traditional PIR (Passive Infrared) sensors that look for heat signatures, PDA compares frames of video over a 2-second period. If enough pixels change between these frames, the system triggers a motion alert. While this makes the camera highly responsive, it also means it can be sensitive to things like shadows or a ceiling fan.
One of the standout hardware upgrades in this second-generation model is its optics. The Blink Mini 2 features a 143-degree diagonal field of view, providing a significantly wider area for activity zone customization compared to the 110-degree field of view on the original Blink Mini. This extra width means you can see more of your room, but it also creates more opportunities for false triggers at the edges of the frame.
It is important to note that Blink Activity Zones are available on the Blink Mini 2 without a monthly fee. While advanced features such as person detection require an optional Blink Subscription Plan, the ability to mask out specific parts of the grid is a standard feature included with the hardware. This allows you to fine-tune your experience and keep your notification feed clean without an ongoing cost.
Step-by-Step: Configuring Your Activity Zones
Setting up Blink Activity Zones is a straightforward process, but it requires a bit of precision to get it right. Before you start, make sure your camera is permanently mounted or placed in its final position. If you move the camera even an inch after setting up your zones, the grid will no longer align with the physical objects in the room.
Follow these steps for the Blink Home Monitor app configuration:
- Launch the App: Open the Blink Home Monitor app on your smartphone. Ensure your Blink Mini 2 is online and showing a recent thumbnail.
- Access Camera Settings: Tap the Settings (gear) icon located above the camera's thumbnail image on the home screen.
- Navigate to Motion Settings: Scroll down the settings menu and select the Motion Settings tab.
- Open Activity Zones: Tap on the Activity Zones option. You will see a grid overlaid on the most recent photo taken by your camera.
- Refresh the View: Tap the Update Photo button (the camera icon in the top right). This ensures you are working with the current Live View interface perspective.
- Select Inactive Areas: The grid selection tool allows you to tap individual squares. Any square that you tap will turn grey. Grey squares represent inactive zones—these are the areas the camera will ignore when looking for motion.
- Use the Advanced Tool: The Blink Home Monitor app includes an 'Advanced' motion zone setting specifically for the Blink Mini 2 that allows users to zoom into the camera's thumbnail for more precise selection of inactive activity zones. This is particularly helpful if you are trying to mask a very small object, like a swaying hanging plant or a digital clock.
- Finalize and Save: Once you have greyed out all the high-traffic or problematic areas, tap Done in the top corner and then hit Save to apply the changes.
The beauty of this system is its flexibility. If you find that you are still getting too many alerts, you can go back in and expand the masked areas at any time.
Reducing False Alerts: Optimization Tips
Even with the perfect grid selection, you might still find yourself troubleshooting why your phone won't stop buzzing. Reducing Blink motion false alerts often requires a combination of smart grid masking and adjusting the motion sensor sensitivity.
Inside the Motion Settings menu, you will find a sensitivity slider with a scale from 1 to 9. By default, most Blink cameras are set to 5. If your Blink Mini 2 is placed in a high-contrast room where sunlight creates moving shadows on the floor, you might need to drop the sensitivity to a 3 or 4. Conversely, if the camera is placed in a hallway where people move quickly, a higher sensitivity of 7 or 8 might be necessary to ensure the recording starts as soon as someone enters the frame.
When considering the best activity zone settings for Blink Mini 2 indoor cameras, look for these common culprits:
- Windows: Rapid changes in light or headlights passing by outside can trigger the PDA system. Mask the entire window area if you don't need to monitor entry through it.
- Ceiling Fans: Even if the fan is in the corner of the frame, the constant movement of the blades will trigger alerts. Use the grid selection to cover the fan's entire rotation path.
- Pet Zones: If you have a dog or cat, you can mask the floor area or furniture where they spend most of their time. This ensures you get alerts for human movement while ignoring your pet's afternoon nap transitions.
By effectively reducing Blink Mini 2 motion false alerts, you increase the value of the notifications you do receive. When your phone pings, you’ll know it’s something that actually warrants your attention.
Troubleshooting Common Zone Issues
Sometimes, users report that their Blink Activity Zones are not working as expected. One of the most common reasons for this is the headlight effect. Because the Blink Mini 2 uses Pixel Difference Analysis, a sudden flash of light across a wall can trigger the sensor even if the light itself is within a masked zone. If the light change is drastic enough to affect the pixels in an active (clear) zone, the camera will record.
Another common point of confusion is the difference between activity zones and privacy zones. Activity zones tell the camera where to ignore motion, but the camera still "sees" that area and records it in the final video. Privacy zones, on the other hand, completely black out a section of the video feed. If you have a doorway that leads to a bathroom or a neighbor's window that you want to respect, use a privacy zone instead of an activity zone.
If you are troubleshooting Blink Mini 2 activity zones not saving, check your connection to the Blink Sync Module 2. While the Mini 2 can work as a standalone device, many users pair it with a module for local storage. If the module is offline or the Wi-Fi signal is weak, the app may fail to push the new grid settings to the camera hardware. Ensure you have a strong signal and try saving the settings again while standing near the camera.
Lastly, keep in mind the physical limits of the hardware. The motion detection range is most effective within 20 feet. If you are trying to set activity zones for an area 30 feet away, the PDA system might not have enough detail to distinguish between meaningful motion and background noise, regardless of how you configure the grid.
FAQ
How do I set up activity zones on my Blink camera?
To set up activity zones, open the Blink Home Monitor app, go to your camera's settings, select Motion Settings, and then tap Activity Zones. You can then use the grid to select which areas you want the camera to ignore during motion detection.
Why is my Blink camera recording outside of activity zones?
Blink cameras use Pixel Difference Analysis, which means if a change in light or a shadow occurs in an active zone—even if the source of the movement is in a masked zone—the camera may still trigger a recording.
How many activity zones can you have on a Blink camera?
Blink cameras use a single grid system for activity zones. You can select as many or as few squares within that grid to be inactive as you like, allowing for highly customized shapes and coverage areas.
What is the difference between activity zones and privacy zones on Blink?
Activity zones determine which areas of the frame trigger a motion alert without hiding the footage. Privacy zones completely black out specific areas of the video feed, ensuring those sections are never recorded or viewed in Live View.
Why are my Blink activity zones not working?
This often happens if the camera has been moved after the zones were set, or if the sensitivity slider is set too high. It can also be caused by a weak Wi-Fi connection preventing the settings from being saved to the camera.