Quick Facts
- Market Reach: The Samsung SmartThings platform had surpassed 430 million global users as of late 2025.
- Device Compatibility: The ecosystem supports approximately 4,700 connected devices from over 390 partner brands.
- Primary Protocols: Supports Zigbee protocol, Z-Wave, and the latest Matter compatibility for cross-platform stability.
- Setup Proximity: Always keep your smartphone within 15 feet of the hardware during the initial pairing process.
- Key Requirement: A registered Samsung Account and a stable 2.4GHz or 5GHz Wi-Fi connection are mandatory.
- Hardware Evolution: Samsung transitioned hardware manufacturing to Aeotec in 2020, though the software remains a core Samsung service.
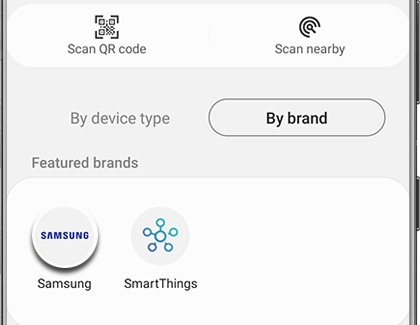
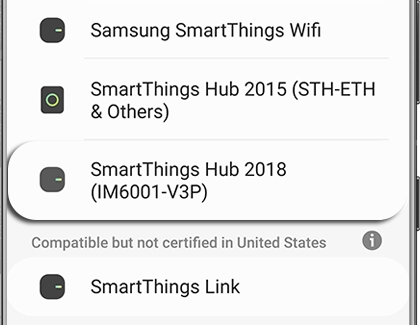
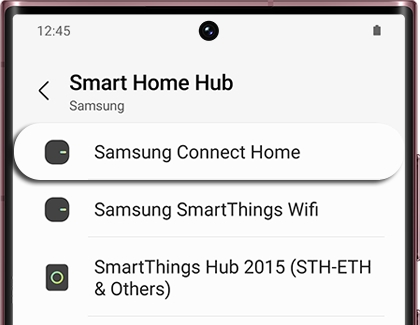
Start your smart home journey by mastering the SmartThings hub setup. To begin a SmartThings hub setup, open the SmartThings app, navigate to the Devices tab, and tap the Add icon. Select the Samsung brand and choose the appropriate Smart Home Hub model. Follow the on-screen prompts to connect the device to your Wi-Fi network and register it to your Samsung account to begin adding compatible sensors and lights.
Pre-Setup Checklist: What You Need to Know
Before we dive into the physical installation, it is important to understand what makes this system tick. As a Samsung SmartThings beginner guide for first-time users, the first thing to clarify is the hardware itself. While you might see the name Aeotec hardware on the box, it is the same technology that powers the Samsung ecosystem. Samsung shifted its focus to the software side of the IoT gateway, while Aeotec now produces the physical Hub v3.
To ensure a smooth Samsung SmartThings app configuration, you need to gather a few essentials. First, ensure you have a modern smartphone with Bluetooth enabled. Second, check your router. While many users prefer a wireless mesh networking approach, having an Ethernet cable handy for the initial setup can prevent many common connection headaches. The platform is incredibly popular because of its high engagement rates; for instance, 92% of Bespoke AI Steam Robot Vacuum purchasers connected their devices to the platform in 2024, proving that the integration is well worth the effort.
Finally, keep the 15-foot proximity rule in mind. During the discovery phase, the hub and your phone need to be physically close to establish a secure handshake. If you are wondering how to set up SmartThings hub v3 without welcome code, modern versions often use a QR code located on the bottom of the device or use "Proximity Pairing" which bypasses the need for the older manual codes entirely.
Step-by-Step Hub Configuration
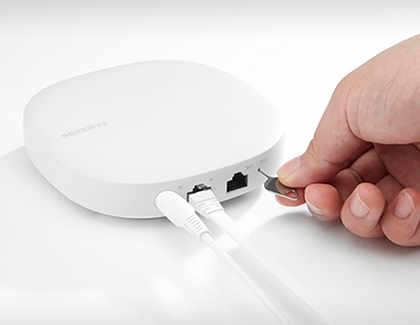
Now, let's get the hardware online. Setting up a SmartThings Wifi or Connect Home hub requires connecting an Ethernet cable from your modem to the hub's IN port. Even if you plan to use Wi-Fi later, this physical connection ensures the initial firmware updates download without interruption. Once you plug in the power adapter, the indicator light on the front will begin to change.
- Power On: Plug the hub into a wall outlet using a Samsung-approved power adapter.
- Monitor the LED: Wait for the SmartThings hub indicator light flashing green state. This signals that the hub is in "Claim Mode" and is ready for discovery.
- Open the App: Launch the SmartThings app on your phone. If you haven't done so, complete your Samsung Account registration.
- Add the Device: Tap the + icon and select Add Device. You can choose to scan for nearby devices or manually navigate to the Wi-Fi/Hub category.
- Connect to Network: Follow the prompts to select your Wi-Fi SSID and enter your password. If you are using an Ethernet cable, the app will automatically detect the wired connection.
During this phase, you might encounter a minor delay while the hub synchronizes its internal clock and firmware. This is normal. If you face an error where the hub is not detected, check that your phone is on the same network frequency (2.4GHz is often more stable for setup than 5GHz) and that you are within that crucial 15-foot range.
Pro-Tip: If the LED stays solid blue or magenta for more than five minutes, it likely means a firmware update is in progress. Do not unplug the hub during this time, as it could corrupt the operating system of your smart home ecosystem.
Troubleshooting LED Status Indicators
| LED Color | Meaning | Action Required |
|---|---|---|
| Flashing Green | Ready to connect | Open the app and start discovery. |
| Solid Green | Connected and online | No action needed. |
| Flashing Red/Green | Pairing mode active | Add your sensors or lights now. |
| Solid Red | Hardware error | Unplug for 30 seconds and restart. |
| Solid Blue | No internet connection | Check your Ethernet cable or Wi-Fi router. |
Connecting SmartThings Compatible Devices
With the hub online, you now have a functional IoT gateway capable of "speaking" to thousands of peripherals. One of the biggest advantages of this platform is its versatility. It doesn't just work with Samsung gear; it acts as a bridge for the Zigbee protocol, Z-Wave, and the new Matter compatibility standard.
When connecting SmartThings compatible devices, the process is generally uniform. You put the peripheral (like a bulb or sensor) into pairing mode—usually by holding a button or toggling a switch—and then use the app to search for it. For those adding compatible smart lights to Samsung Home Hub, look for the Matter QR code on the side of the bulb. Matter allows for faster, more reliable local control that doesn't rely on the cloud.
However, if you are bringing over older hardware from a different system, you must learn how to exclude Z-Wave devices before adding to new SmartThings hub. Z-Wave devices "remember" their previous controller. To clear this memory, go to your Hub settings in the app, select Z-Wave Utilities, and tap Z-Wave Exclusion. While this mode is active, perform the pairing action on your old sensor. The app will confirm the device has been "Excluded," and only then can you successfully add it to your new setup.
Advanced Automation: SmartThings Scenes and Routines
The real magic happens once your devices are organized into rooms. Instead of just turning on a light with your phone, you can create Home automation routines that handle the work for you. This is where the Samsung Home Hub beginner guide transitions from basic setup to professional-grade automation.
The app uses a simple "If/Then" logic. For example: If the front door sensor opens Then turn on the hallway light and set the thermostat to 72 degrees. You can also create SmartThings Scenes, which are groups of settings you can trigger with one tap. A "Goodnight" scene might lock all doors, turn off all lights, and arm your security system simultaneously.
Samsung has recently moved toward local processing through SmartThings Edge. This means that instead of your request traveling to a server in the cloud and back, the logic happens right inside your hub. This significantly reduces latency and ensures your routines work even if your internet connection goes down. You can also integrate SmartThings Find, which helps you locate lost Galaxy tags or smartphones directly through your home dashboard.
FAQ
How do I set up a SmartThings hub?
To set up the hub, plug it into power and connect it to your router via an Ethernet cable or Wi-Fi. Open the SmartThings app, tap the plus icon to add a device, and select the hub model. The app will guide you through the Samsung Account registration and network configuration steps.
What do I need to start with SmartThings?
You need a SmartThings-compatible hub (like the Aeotec Smart Home Hub), a smartphone with the SmartThings app installed, a stable internet connection, and a Samsung account. You will also need smart devices that use Zigbee, Z-Wave, or Matter protocols to build out your system.
How do I connect my SmartThings hub to Wi-Fi?
During the initial setup in the app, you will be prompted to choose a connection method. Select Wi-Fi and choose your network from the list. If your hub is already set up via Ethernet and you want to switch to Wi-Fi, you may need to reset the hub and perform the setup process again to update the network settings.
Why is my SmartThings hub not connecting?
Common issues include being too far from the hub during setup (stay within 15 feet), using an incompatible Wi-Fi frequency (ensure you are using 2.4GHz if 5GHz fails), or a firewall on your router blocking the hub. Ensure the SmartThings hub indicator light flashing green is visible before attempting to pair.
Do I need a hub for all SmartThings devices?
No, some devices connect directly to your Wi-Fi and link to the app via cloud-to-cloud integration. However, a hub is required for any devices using the Zigbee protocol or Z-Wave, and it is highly recommended for Matter devices to enable local processing and faster response times.
How do I add devices to my SmartThings hub?
Put your smart device into its specific pairing mode. In the SmartThings app, tap the + icon, select Add Device, and either scan for nearby devices or choose the brand and device type from the list. The hub will then scan its radio frequencies to find and link the new hardware.
Setting up your smart home shouldn't be a chore. By following this guide, you have laid the foundation for a truly connected life. Whether you are starting with a single light or building a massive multi-room system, the versatility of the SmartThings platform ensures your home will grow with you. If you ever feel stuck, remember that troubleshooting SmartThings hub not found during setup is usually just a matter of checking your proximity or ensuring that your LED is in the correct flashing state. Happy automating!